Drum brakes are widely used in various kinds of automobiles because it offers people numerous advantages. First, they are not that expensive. Second, the engineering technology behind the use of such devices is simple yet quite amazing and highly efficient. Third, they can work well together with parking brakes. For a chance to enjoy these advantages in a continuous manner, learning how to change drum brakes is truly a good thing.
Materials and Tools Needed
People need to have several tools and materials in hand if they want to know how to change drum brakes. These include wrenches, brake spring pliers and brake shoes. In addition, bring in a dust mask, white lithium grease and latex gloves. This task is definitely easier if there are also pliers, a hammer and pry bar. Furthermore, get latex gloves, a screwdriver and brake retainer tool. The jack and jack stands also have important roles to play in this task.
Removing the Drum Brakes
Determine whether the vehicle is a front-wheel drive or a rear-wheel drive. Knowing this will make the job at hand much easier. Find where the master cylinder is situated within the vehicle. Once you find it, remove the brake fluid by simply draining. Be sure to drain about half of its content. After that, fill the void with a new brake fluid.
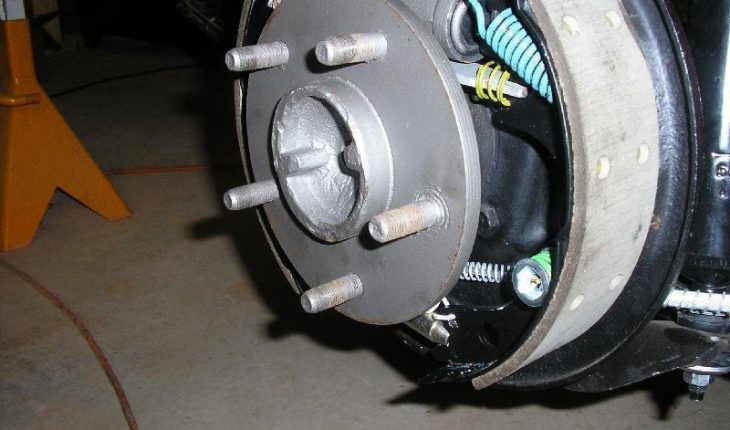
Take off the tires of the vehicle. If the vehicle is a rear-wheel drive, look at the wheel studs and then locate the round clip. Remove it as well as the drum brakes. When removing, never apply too much force. For a front-wheel drive vehicle, remove the wheel bearings and the bearing cap. After that, take the drum brakes off without putting on too much force. If they are not that easy to remove, lubricate them. If not, loosen the adjustment screw.
If the vehicle has a parking brake cable, remove it. Do the same thing to the springs holding the brake shoes. Be sure to remove everything connected to the brake shoes. After that, take them off as well.
Installing the Replacement
Locate the backing plate and then align the brake shoes right into it. Attach the screw assembly as well as the self-adjustment spring. Do the same thing to the drum brakes core hardware. Likewise, connect the return springs. Attach the new brake drums. Return the wheels properly. Perform a test drive on the vehicle.
Additional Tips and Information
When performing the test drive, never drive too fast to ensure safety. More importantly, do not try to do this task if you do not have the right tools and materials to get the job done. Furthermore, it is also very important to do each step carefully and correctly.